
| ||||||||||||||||||||||||||||||||||||||||||||||||||||
|
LISA '04 Paper
[LISA '04 Technical Program]
LifeBoat - An Autonomic Backup and Restore Solution(Atlanta, GA: USENIX Association, November, 2004). AbstractWe present an innovative backup and restore solution, called LifeBoat, for Windows machines. Our solution provides for local and remote backups and ``bare metal'' restores. Classic backup systems do a file system backup and require the machine to be installed before the system can be restored or they do a block for block backup of the system image which allows for a ``bare metal'' restore, but makes it hard to access individual files in the backup. Our solution does a file system backup while still allowing the system to be completely restored onto a new hard drive. Windows presents some particularly difficult problems during both backup and restore. We describe the information we store during backup to enable the ``bare metal'' restore. We also describe some of the problems we ran into and how we overcame them. Not only do we provide a way to restore a machine, but we also describe the rescue environment which allows machine diagnostics and recovery of files that were not backed up. This paper presents an autonomic workgroup backup solution called LifeBoat that increases the ``Built-In Value'' of the PC without adding hardware, administrative cost, or complexity. LifeBoat applies autonomic principles to the age old problem of data backup and recovery. IntroductionSupporting PC clients currently represents roughly 50% of overall IT cost (IGS 2001). This number is larger than both server (30%) and network related costs (20%). This provides the motivation for an autonomic approach to reducing the cost of PC clients. So far, thin clients have repeatedly failed in the marketplace. IT attempts to ``lock down'' PC clients have not been accepted. In addition, attempts to control the client from the server have failed due to the fact that clients sometimes get disconnected. Fat clients, however, continue to prosper and increase in complexity which drives the maintenance cost up. We believe autonomic clients are critical components of an overall autonomic computing infrastructure. They will help lower the overall cost of ownership and reduce the client down time for corporations. The secure autonomic workgroup backup and recovery system, LifeBoat, provides data recovery and reliability to a workgroup while reducing administrative costs for Windows 2000/XP machines. LifeBoat provides a comprehensive backup solution including backing up data across the peer workstations of a workgroup, centralized server backup, and local backup for disconnected operation. In addition, it provides a complete rescue and recovery environment which allows end users to easily and conveniently restore downed machines. The LifeBoat project increases the Built-in Value of the PC without adding hardware, administrative, or complexity costs. By leveraging several autonomic technologies, the LifeBoat project increases utility while reducing administrative cost. In this paper we first describe the backup portion of LifeBoat. This is split into two sections, the first of which focuses on network backup. LifeBoat leverages a research technology called StorageNet to seamlessly spread backup data across the workstations of a workgroup in a peer-to-peer fashion. We then create a scalable road map from workgroup peer-to-peer to a centrally managed IT solution. The second backup section focuses on backing up to locally attached devices which is a requirement for disconnected operation. We then describe the complete rescue and recovery process which simplifies recovery of files and directories as well as providing disaster recovery from total disk failure. Next we describe a centralized management approach for LifeBoat and how LifeBoat can fit within a corporate environment. We conclude with performance measurements of some example backup and restore operations. BackupLifeBoat supports a number of backup targets such as network peers, a dedicated network server, and locally attached storage devices. The Autonomic Backup Program is responsible for creating a backup copy of a user's file system in such a way as to be able to completely restore the system to its original operating state. This means that the backup must include file data as well as file metadata such as file times, ACL information, ownership, and attributes. Our backups are performed file-wise to enable users to restore or recover individual files without requiring the restoration of the entire machine such as with a block based solution. Finally, the backups are compressed on the fly in order to save space. The Autonomic Backup Program performs a backup by doing a depth first traversal of the user's file system. As it comes to each file or directory, it creates a corresponding file in the backup and saves metadata information for the file in a separate file called attributes.ntfs which maintains the attributes for all files backed up. There is special processing required for open files locked by the OS. The backup client employs a kernel driver to obtain file handles for reading these locked files. This driver stays resident only for the duration of the backup. When a backup is completed, the client generates a metadata file to describe the file systems which have been backed up. This ``usage'' file contains partition, file system, drive lettering, and disk space information. The existence of the usage file indicates that the backup was successful. The output of the backup and format of the backup data depends on the target. For a network backup, the data is stored using a distributed file system known as StorageNet. StorageNet has some unique features which make it especially suited for our peer-to-peer and client-server backup solutions. For a backup to locally attached storage, the backup is stored in a Zip64 archive. StorageNet OverviewThe storage building block of our distributed file system, StorageNet, is an object storage device called SCARED [2] that organizes local storage into a flat namespace of objects identified by a 128-bit object id. A workstation becomes an object storage device when it runs the daemon to share some of its local storage with its peers. While the object disks we describe here are similar to other object based storage devices [2, 3, 4, 8], our model has much richer semantics to allow it to run in a peer-to-peer environment. Clients request the creation of objects on SCARED devices. When an object is created, the device chooses an object id to identify the newly created object, marks the object as owned by the peer requesting creation, allocates space for it, and returns the object id to the client. Clients then use the object id as a handle to request operations to query, modify, and delete the object. An object consists of data, an access control list (ACL), and an info block. ACLs are enforced by the server so that only authorized clients access the objects. The info block is a variable sized attribute associated with each object that is atomically updated and read and written by the client. The info block is not interpreted by the storage device. One special kind of object creation useful in backup applications is the linked creation of an object. We implement hard links by passing the object id of an existing object when requesting creation. A hard link shares the data and ACL of the linked object, but has its own info block. These linked objects allow us to not only create hard links to files, but also to directories. Hard linked objects are not deleted until the last hard link to the object is deleted. There are two kinds of objects stored on SCARED devices. File objects have semantics similar to local files. They are a stream of bytes that can be read, written, and truncated. Directory objects are the other kind of object; they are an array of variable sized entries. Entries are identified by a unique 128-bit number, the etag, set by the daemon as well as a unique 128-bit number, the ltag, set by the client. The client chooses an ltag by hashing the name of the file or directory represented by an entry. The entry also has variable sized data associated with it that can be read and set atomically. Later we will describe how these objects are used to build a distributed file system, but here we need to point out that the storage devices only manage the allocation and access to the objects they store. They do not interpret the data in those objects, and thus, do not know the relationships between objects or know how the objects are positioned in the file system hierarchy. Because the data stored on the storage devices is not interpreted, the data can be encrypted at the client and stored encrypted on the storage devices. SCARED devices also track the allocations of objects for a given peer to enforce quotas. Later we will explain why quota support is needed, but for now it is important to note this requirement on the storage devices. Along with object management, storage devices also authenticate clients that access them. All communication is done using a protocol that provides mutual authentication and allows identification of the client and enforcement of quotas and access control. Note that communication only occurs between the client and storage device; storage devices are never required to communicate with each other. Clients use data stored on the object storage devices to create a distributed file system. The clients use meta-data attached to each object and directory objects to construct the file system. The directory entries are used to construct the file system hierarchy and the info blocks are used to verify integrity. Figure 1 shows the layout of the directory entries as interpreted by the client. The first three fields are maintained by the storage device. The other fields are stored in the entry data and thus stored opaquely by the storage device. The client needs to store the filename in the entry data since the ltag is the hash of the filename, which is useful for directory lookups, but the actual filename is needed when doing directory listings. The other important piece of information is the location of the object represented by the entry or, if the entry is a symbolic link, the string representing the symbolic link which is stored in the entry data.  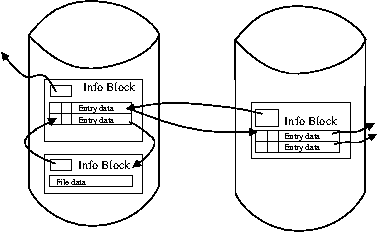 Figure 2 shows a fragment of the distributed file system constructed using the structures outlined above. The first device contains two objects. The first object is a directory with two entries. The first entry represents a directory stored on the second device. The second directory entry is a file that is stored on the same device. Peer-to-Peer Network BackupIn the peer-to-peer case, our system backs up workstation data onto other workstations in the workgroup. This is accomplished by defining a hidden partition on each workstation that can be used as a target of the backup. The architecture of the software components in the system is completely symmetric. Each workstation runs a copy of the client and the StorageNet server. In this way each station serves as both a backup source and target. In addition, each station runs a copy of the Lifeboat agent process. This always runs, provides, and serves the web user interface that constitutes the policy tool to allow the user to make changes to backup targets, select files for backup, and set scheduling times. At the appointed time, this process will invoke the backup client program as well. The hidden partition is created during the installation process and is completely managed by the StorageNet server on each station. The customer uses the client software to specify what data to backup and on what schedule. The target of the backup is determined by the system and can be changed by the customer on request. In the case of an incremental backup, our StorageNet distributed file system offers some very strong advantages over traditional network file systems. For example, one feature which we use a great deal is the ability to create directory hard links. In this way, if an entire subtree of the file system remains unchanged between a base and an incremental backup, we can simply hard link the entire subtree to the corresponding subtree in the base backup. When individual files remain unchanged, but their siblings do not, we can hard link to the individual files, and create new backup files in the directory. This unique directory and file hard linking ability allows each backup in our file system, both base backup and incremental backups, to look like an entire mirror image of the file system on the machine being backed up. Each incremental backup only takes up the same amount of space as what has changed between backups. In the local case, incremental backups look like a subset of the file system. Pieces of the file system that did not change are simply not copied into the zip. In order to distinguish between files that are unchanged and files that have been deleted, we keep a list of files which have been deleted in ``DeletedFiles.log.'' This is used during the restore to know which files not to copy out of the base. For example, consider backing up the file helloworld.txt. In the remote scenario, this file is copied to our StorageNet distributed file system. The filename, file data, file times, and file size are all set in the StorageNet file system. File dates and sizes are not stored redundantly in this case because the cost of looking them up later during an incremental is free. This is because during a remote incremental, we are also doing a depth first traversal on the base backup. File ACL, attributes, and ownership information is placed into attributes.ntfs file for use during restore. The short-name data is stored in the directory entry for this file. Although StorageNet has no 8.3 limitations, it makes provision for this information to maintain full compatibility with Windows file systems. Why We Need QuotasSince all the peers store their data remotely, if any peer fails it can recover from its remote backup. It is tempting to randomly spread a given peers backup across all of its peers. Spreading this way gives us some parallelism when doing backups and should speed our backup. However, if we do spread a given machine's backup uniformly across its peers, we cannot tolerate two failures since the second failure will certainly lose backup data that cannot be recovered. Instead of spreading the data across peer machines, we try to minimize the number of peers used by a given machine for a backup. Thus, if all machines have the same size disks, when a second failure happens there will only be a $1 over (n~-~1)$ chance that backup data is lost for a given machine. Unfortunately, we cannot assume that all peers have the same sized disks. Thus some peers may store the backup data of multiple clients, and other peers may use multiple peers to store their backup. If the disk sizes are such that a peer's backup must be stored on multiple peers and those peers in turn store backups from multiple peers, the backups can easily degenerate into a uniform backup across all peers unless some form of quotas are used. Peer Backup ScenariosThe number of scenarios that are supported by this solution is virtually innumerable. However, there are some attributes that constitute simple scenarios. For example, we can consider the most simple scenario in the peer-to-peer case to be the completely symmetric homogeneous case where all stations provide a hidden partition that is equal in size to their own data partition, and each stations data is backed up to a neighboring station. Figure 3 shows an example for three workstations. 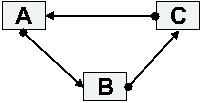 In this case every machine backs up its data in the hidden partition of its neighbor. 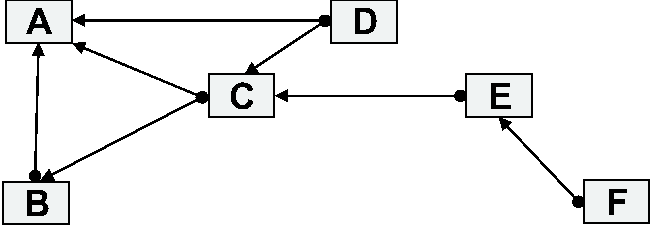 Figure 4 shows a more complicated scenario. In this case, the following statements hold true for the backup group:
Either of these scenarios could have resulted from:
Obviously these two scenarios are not exhaustive. Configurations of arbitrary complexity are supported. We intend to develop heuristics and user interface methods to reduce possible complexity and allow the customer to efficiently manage the backup configuration. Dedicated Server Network BackupOne of the big advantages of using dedicated servers as opposed to peers is the availability of service. Because peers are general purpose user machines, they may be turned off, rebooted, or disconnected with a higher probability than with dedicated servers. In a large enterprise environment using a dedicated server approach can guarantee backup availability. Machine stability is important when trying to do backups. Dedicated servers are also easier to manage because of their fixed function. Machines are also easier to update and modify by an admin staff if they belong to the IT department rather than users. The dedicated server solution uses StorageNet in a similar fashion as the peer-to-peer approach. The dedicated server acts as the target StorageNet device for the backup clients and backup data is stored in the same fashion as the peer approach. Indeed, the architecture makes no distinction between dedicated servers and peers. In this way, the dedicated server solution is only a special case peer-to-peer usage scenario. Local BackupFor mobile users the ability to perform regular backups to local media is critical. There are several configurations that we must deal with in order to provide local backup. The simplest one is for a system with one internal hard drive which contains the data we wish to back up and one additional hard drive where the backup is stored. The hard drive containing the backup can be either an external USB/Firewire drive or internal hard drive. The user is also allowed to perform backup locally to the source hard drive. In this case we use a file system filter driver to protect the backup files. While this form of backup wont protect the user from hard drive failures, it will allow recovery from viral attacks or software error. The format of the backup is rather simple. We use a simple directory structure. The main directory is called LifeBoat_Local and for every machine backed up to the drive we add another sub directory. This sub directory, for example test, will contain multiple directories and files. The most important file contains the UUID of the machine that is backed up and is called the machine file. It contains the serial number of the machine and UUID as returned by DMI [1]. We use this file during the restore procedure to automatically detect backups. A sample machine file is in Figure 5. 2658N5U AKVAA2W 00F7D68B-0AA0-D611-88F2-EDDCAE30B833 The first time a local backup is run, we create a directory called base and place it in LifeBoat_Localest. Additional backups are placed in directories called Incremental 1, Incremental 2, etc. The number of incremental backups is user configurable, with the default value set at five. The full directory structure can be seen in Figure 6. Each of the directories such as base and Incremental 1 contain the following files: usage, attributes.ntfs, backup.lst, and some zip files. In the case of a filesystem that is less than 4 GB compressed, a single zip file, backup.zip suffices. Otherwise, the Zip64 spanning standard is used.  The first line of the usage file lists descriptions of columns inside the usage file: drive letter, file system type, size of the partition, amount of used space and amount of backed up data. In the next line is an OS descriptor which is important for post processing after restore. Possible descriptors are WinXp, Win200, WinNT4.0, WinNT3.5, Win98, Win95 and WinME. Lines that follow give information about each partition in the system. They are used during restore process. The attributes.ntfs file is of importance only when backing up/restoring NTFS partitions and is not used if the partitions are not NTFS. The attributes.ntfs file contains all file attributes as well as ACL, SACL, OSID and GSID data. We write the data during backup and restore it during the restore post processing step. Backup.zip contains the actual backup of all files. Through extending ZIP functionality to use the current Zip64 specification, we are able to create ZIP files that are very large, dwarfing the original 2 GB limit. If the backup is greater then 4 GB zipped we can create multiple backup files (backup.zip, backup.001, etc.) using the Zip64 spanning standard. We chose 4 GB as our spanning limit in order to allow these files to be read by FAT32 files systems. For example, let's imagine we are doing a base backup and come to the file ``helloworld.txt'' which contains data as well as some ACL information. This file would be added to the backup.zip file and compressed, taking care of the filename, file data, modification date, and file size. The file dates and size are also placed in a metadata file, backup.lst, to be used later when creating incremental backups to determine whether the file has changed and needs to be backed up again. File ACL, attributes, and ownership information is placed into the attributes.ntfs file for use during restore. Finally, the short name for this file, for example ``hellow~1.txt'', is stored in the comments section of the zip file. Preserving shortnames across backup and restore turns out to be very important even in later Windows versions. Some Windows applications still expect the short names for files to not change unless the long filename changes as well. A special case of local backup is the backup to yourself case. In this case we have only one hard drive and we want to backup the data to the same drive we are backing up. In the simple case we have multiple partitions on the hard drive, for example we backup drive C to drive D. In a more complex case where we have to deal with a single partition we backup C to C. As far as backup is concerned this is not problematic, however during restore we have to deal with some very specific problems related to NTFS partitions and the lack of write support under Linux. Rescue and RecoveryA significant portion of the LifeBoat project focuses on client rescue and recovery. This includes several UI features for Windows as well as a bootable Linux image. The rescue operations allow a user to perform diagnostics and attempt to repair problems. Recovery enables the user to restore individual files or even perform a full restore in the case of massive disk failure. Single File RestoreWhen the system is bootable, it is possible to restore a single file or a group of files from within Windows [6]. In keeping with the autonomic goal of the system, the user interfaces for this system are minimal. From Windows, the restore process uses a simple browser interface to StorageNet using the browser protocol istp:// . A screenshot of the istp protocol is below in Figure 7. We have also written a namespace extension for StorageNet which behaves like the ftp namespace extension which ships with Windows. An example screen looks almost identical to that for ftp:// and uses the analogous Copy- Paste commands (see Figure 8). 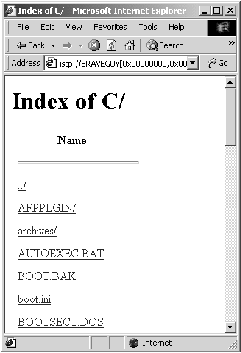  RescueThe LifeBoat Linux boot CD provides various software services that can be used for systems maintenance, rescue, and recovery. The distribution works in almost any PC and can be booted from a number of devices such as a CD-ROM drive, USB keyfob, local hard drive, or even over the network. The CD includes over 101 MB of software including a 2.4.22 kernel, Xfree86 4.1, full network services for both PCI and PCMCIA cards and wireless connectivity. An important part in the design of the bootable Linux CD was rescue functionality. We wanted to provide the user with at least a rudimentary set of functions which would enable him to diagnose, report, and fix the problem if at all possible. As part of the CD we included the following set of rescue functions: PCDoctor based diagnostics which lets us run an all encompassing array of hardware tests, AIM as way of quickly communicating with help available online, and the Mozilla web browser. We also developed an application which finds all bookmarks on the local drive, in the local backup, and in the remote backup and makes them available for use in Mozilla. This provides the user with the list of bookmarks that he is used to. At the same time we add a selection of bookmarks which can be custom tailored for a specific company to include their own links to local help desk sites and other useful resources. Even in the face of disaster, an important issue to keep in mind is that a damaged hard disk may still contain some usable data. In the case of a viral attack, boot sectors and system files could be compromised but the user data could be left intact. Performing a full system restore would overwrite any changes made since the last backup. For this case we created an application that browses through all documents that were recently accessed and allows the user to copy them to a safe medium such as a USB keyfob or hard drive. RecoveryFull machine recovery is a vital part of any backup solution. The Lifeboat solution uses its bootable Linux CD for full machine restore. This is necessary when the machine cannot be booted to run the Windows based restore utilities. In order to use the CD for system recovery we added a Linux virtual file system (VFS) implementation for StorageNet. Located on the CD is our Rapid Restore Ultra application which is used to restore both local and remote backups. Rapid Restore Ultra is written in C and uses QT for the UI elements [9]. The application comes in two flavors. The first one is intended for a novice user that has no deep knowledge of systems management issues and just wishes to restore the data. The second version is intended for knowledgeable system administrators or advanced users that have deep knowledge of internal systems functioning. The novice user just restores the latest backup and the application determines how the backup is to be restored. Advanced users can select any backup on the discoverable network or local devices, as well as forcing the discovery of backups on a non local networks by entering the IP address or name of a potential server. The user can then manually repartition the drives, and assign drive letters and data. Drive partitions can even be set to different sizes than were originally backed up. This way the user has full control of the restore process. Performing a Full RestoreThe first step towards machine recovery is creation of new partitions. To do that we can either use the description of partitions from the usage file in the last backup or let the user decide the partition sizes and types. The usage file is used for both local and remote restores and gives all the information about the old partition table. In order to determine new partition sizes we use a simple algorithm that takes into account old partition size, new partition size, the number of partitions, and the percentage of usage. Before we write the partition table we have to make sure we have a valid Master Boot Record (MBR). To be sure we dump our MBR onto the first 32 sectors of the drive. It is important to keep in mind that the MBR that is written at this moment has no partition information. If there were any partition info at this step in the MBR, we couldn't be sure that the disk geometry we are using is correct. After writing the MBR, we write the partition table. After the partition table is successfully written we have to format all partitions. One of the issues is the need to support all of the current Windows file systems such as FAT, FAT 16, FAT 32 and if possible, NTFS. Linux can format all of the FAT file systems, but can't create bootable FAT file systems. In order for a file system to be able to boot, the master boot record must point to a valid boot sector. Support for NT, WIN2k and XP is provided through the use of our application. We pieced together information about Windows boot sectors and after long debugging found a way to create valid boot sectors on our own. The reason why we are unable to use the original boot sectors from a previously backed up machine is simple. Boot sectors are dependent on partition sizes and geometry, thereby requiring us to create them every time we repartition. Another reason for not restoring the boot sector from a backup is that boot sectors are a favorite hiding place for viruses. After the disk is formatted and the boot sectors are written, we start the client application to restore the data. If we are performing remote restore, the client connects to the server and upon successful authorization the files, including the operating system, are copied to the local partition. This process is repeated for as many partitions as necessary. After all the files are transferred the machine is rebooted and available for work. Here is a summary of the steps performed in this process:
If we are performing a local restore there are multiple issues we have to face. The first problem is related to having the backup located on the same drive we are trying to restore to. If this is the case, we are unable to reformat the partitions and also we cant change partition sizes. Another issue is related to NTFS support in Linux. Lets say we are backing up to the C drive and it is formatted NTFS. When the restore starts it will find the backup on the first partition and notice that the partition type is NTFS. While Linux has very good support for reading NTFS file systems it has minimal support for writing NTFS. The solution to this, which is detailed in the next section, is a technique for formatting an existing NTFS partition as FAT32 while preserving the backup files. Once all the preparatory steps are successfully completed, we start unzipping data to the desired partition. If we have only a base backup, the restore process ends when unzipping of the base backup.zip file is completed. In case of incremental backups the restore process is more complicated. Suppose we have three incremental backups and the base backup. If we wish to restore the third incremental backup, we start by unzipping the backup.zip located in the Incremental 3 directory. Then we unzip the backup.zip located in the Incremental 2 directory and so on. We do this until we have finished the backup.zip in the base directory. Each time we have to make sure that no files get overwritten. Once unzip finishes we have to create post processing scripts that will run immediately following Windows boot. We have to take care of two problems: proper assignment of drive letters and NTFS conversion. In case of a backup with more than three partitions we cant be sure that once Windows comes up it will assign correct drive letters to their respective partitions. It is also possible that we didnt use C, D, or E as drive letter in Windows but for example C, G, and V. While performing backup we add a file called driveletter.sys to each drive on the hard disk. This file only contains the drive letter. The first thing after restore we need to do when windows comes up is change drive letter names. This is done easily by changing registry entries to values we read from driveletter.sys and doesnt even require a reboot. A second problem is related to NTFS partitions. When we restore we create our partitions to be FAT32 and format them accordingly. Once restore is completed and drive letter assignment has run its course, we have to convert those partitions back to NTFS. This is accomplished using the convert.exe utility that is supplied in Windows. Upon completing conversion of the drives to NTFS we have to set attributes and ACLs for all files on that drive. We wrote a simple application that reads the content of the attributes.ntfs file and sets ACL, System ACL, Owner SID, and Group SID as well as file creation/modification times. This application lets us set all file attributes. Upon completion it deletes the attributes.ntfs file and exits. That is also the last step in post processing. Same Partition NTFS BackupIn order to overcome the lack of write support in the Linux NTFS driver we developed a technique whereby an NTFS partition can be formatted as FAT32 while preserving the backup files. This is in essence converting an NTFS partition to FAT32. The conversion process consists of a number of steps. First a meta file which contains data about the file to be preserved is created. Next the set of parameters for formatting the partition as FAT32 is carefully determined. The next step is running through all of the files to be preserved and relocating on disk only those portions that need to be moved in order to survive the format. The partition is formatted and the files are resurrected in the newly created FAT32 partition. Finally, directories are recreated and the files are renamed and moved to their original paths. The set of files that need to be preserved must be known a priori. In the case of the LifeBoat project, this consists of a directory and a small set of potentially large files. The first step is to create the meta file which contains enough information to do a format while preserving these files. The meta file may be created immediately after a backup from within Windows or, if the NTFS partition is readable, it is created in a RAM disk from within the Linux restore environment. 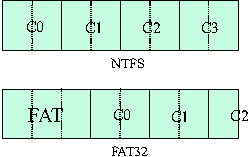 In the case of Windows, the file locations are available through standard API's, and the meta file contains itself as the first entry. In the case of Linux the NTFS driver does not provide a way to find out the clusters of a file. An ioctl was added to the driver for this purpose. A typical meta file is well under 8K in size so excessive memory use is not a concern. Creating a meta file is not the only preparation required for formatting the NTFS partition as FAT32. The data files all reside on cluster boundaries. Unfortunately, NTFS numbers its clusters starting with zero at the first sector of the drive, while FAT32 begins its clusters at the sector immediately after the file allocation tables. Formatting with the same cluster size does not necessarily mean that the clusters will be aligned properly (see Figure 9). A solution to the cluster alignment problem would be to always format the FAT32 partition with a cluster size of 512 bytes (one sector) and cluster downsizing the extent data by splitting it into 512 byte clusters. In practice this leads to an extremely large file allocation table when partitions run into the gigabytes. The cluster size of the FAT32 file system is determined by constraining the size of the resulting file allocation table to be a configurable maximum size (default 32 MB). The simplest way to determine this is to loop over an increasing number of sectors per cluster in valid increments until the resulting calculation of the fat size exceeds the maximum. In order to align the clusters, we manipulate the number of reserved sectors until the newly created FAT32 partition and the former NTFS partition are cluster aligned. At this point the layout of the FAT32 file system and the potentially larger cluster size is determined. Before formatting can occur, the extents of all the data files must be preprocessed to relocate any extent that is either located before the start of the FAT32 data area or does not start on a cluster boundary. In the best case, the cluster size has not changed, so only the first set of relocations must occur. Otherwise relocating an extent requires allocating free space on the disk at a cluster boundary and possibly stealing from the file's next extent if its length is not an integral number of clusters. Moving an extent's data is time consuming so it is avoided whenever possible. Free space on the disk is found using a sliding bitmap approach. Any cluster that is not in use by an entry in the meta file is considered free. A bitmap is used to mark which clusters are free and which are in use. The relocation process requires that enough free space is available to successfully relocate necessary portions of the files to be preserved. When restoring to the same partition this will always be the case. Formatting is the simplest step. The mkdosfs program performs a semi-destructive format in that it only overwrites the reserved and file allocation table sectors. The `-f' switch is used to limit the number of file allocation tables to one. Once the file system is formatted as FAT32, entries for the files to be preserved must be created. This is done via a user space FAT32 library written for this purpose. The user space library can mount a FAT32 partition and create directory entries in the root directory. It uses the data from the meta file to resurrect each meta file entry by creating a directory entry and writing the extents to the file allocation table. Once all of the files have been resurrected, it is safe to use the Linux FAT32 driver to write to the partition. The meta file is traversed once again to create the full paths and rename all of the files to their proper names. Finally, resident files are extracted from the meta file and written. At this point the partition has been converted from NTFS to FAT32 while preserving all of the files necessary to perform a restore. Centralized ManagementIn the case of multiple work groups, management issues become highly important. If a system administrator is supposed to deal with multiple groups with ten or more PCs he will need some sort of an autonomic system to simplify the management of storage. We based our system on IBMDirector which is widely available and boasts a high acceptance rate throughout the industry. To enable IBMDirector for our purposes we extend it in several ways. We developed extensions for the server, console and clients. Below we quickly detail the nature of those extensions. Client side extensions are written in C++. The extensions provide all backup/restore functions as described elsewhere in this document. An important extension is related to communication between the client and server. The communication module relays all the requests and results between the two machines. The client also starts a simple web server which upon authorization provides information about the given client. This feature was implemented for the case where no IBMDirector server is available or when the server is not functioning properly. The information exported on the web page is the same as what can be obtained through the IBMDirector console. The information exported is shown below:
Server and console side extensions are written in C++ and java. They are rather simple since all we need to add on the server are basic GUI elements that allow us to interface with the client and to receive data sent from the clients. The most complex extension is related to extending associations so that all StorageNet devices in the same work group appear in treelike form. The goal of this part of the project is to make a system that will be usable with or without the IBMDirector server. The Corporate EnvironmentOur primary target environment in developing this system is a workgroup satellite office. If this is used in a corporate environment, there is the need for administrator level handling for setup, control and migration. Similar to the workgroup setting, the requirements of the workstation user are limited to:
In contrast, the administrator in the corporate environment has requirements for additional control and data, including:
The asset collection process on the user's machine sends the UUID (machine serial number) to an administrative web server. A long running process on the server discovers available backup targets. The administrator reviews a web page containing unassigned backup clients and discovered servers, and assigns these clients to a server. This information is recorded and used by the client backup process (usually scheduled) to keep the user's data. This assignment information is also used by the file and image restoration processes. Described graphically, we have: 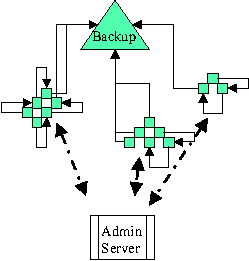 The detailed processing flow is:
 PerformanceDuring the extensive testing we gathered several interesting numbers that reflect the speed and efficiency of the backup and restore process [5]. Figure 12 shows the time in seconds for backing up and restoring 2.3 GB of data for a number of different target locations [7]. The restore process is measured from clicking on the restore button to the finish (reboot of a machine). Our main test machine is a ThinkPad R32 with 256 MB RAM and IBM 20 GB hard drive. A separate series of tests were performed using a 1.6 GHz Pentium M IBM ThinkPad T-40. A 1.7 GB image requires three minutes (156 sec) to backup. The restore from local HDD requires 15.5 minutes from selecting the restore button of which ten minutes is file system preparation and data transfer and seven minutes is rebooting and converting. The final stage requires two minutes to complete the attribute restore into the NTFS file system. This makes the total time 17.5 minutes. We have tested this repeatedly for at least 20 times on four systems with minimal variation. The main variations seem to be related to the file system preparation step which takes a minute or two longer after a base backup is re-established. When compared to Xpoints software:
ConclusionLifeBoat provides a way to backup system such that the backup files are accessible for single file restore as well as a full image restore. Our work also shows how Linux can be effectively used to restore a Windows(tm) system while also providing a rescue environment in which a customer can salvage recent files and preform basic diagnostics and productivity work. Most importantly this system allows for a machine to be completely restored from scratch when the boot disk is rendered unbootable. The local backup version of this work shipped as part of IBM's Think In this paper we presented a description of the latest research project in autonomic computing at IBM Almaden Research Center. We described a fully autonomic system for workgroup based workstation backup and recovery with options for both everyday restore of a limited number of files and directories as well as full catastrophe recovery. This project is work in progress and is funded partially by the IBM Personal Systems Institute. References[1] Distributed Management Task Force, System Management BIOS (SMBIOS) Reference Specification, Version 2.3.4, December 2003.[2] Reed, Benjamin C., Edward G. Chron, Randal C. Burns, and Darrell D. E. Long, ``Authenticating Network-Attached Storage,'' IEEE Micro, Jan 2000. [3] Gibson, Garth A., David F. Bagle, Khalil Amiri, Fay W. Chang, Eugene M. Einberg, Howard Gobioff, Chen Lee, Berend Ozceri, Erik Riedel, David Rochberg, and Jim Zelenka, ``File Server Scaling with Network-Attached Secure Disks,'' Proceedings of the ACM International Conference on Measurement and Modeling of Computer Systems (Sigmetrics), June 1997. [4] Miller, Ethan L., William E. Freeman, Darrell D. E. Long, and Benjamin C. Reed, ``Strong Security for Network-Attached Storage,'' FAST 02. [5] Zwicky, E. D., ``Torture Testing Backup and Archive Programs,'' Selected Papers in Network and System Administration, USENIX. [6] McMains, J. R., Windows NT Backup and Recovery, McGraw Hill, 1999. [7] Stringfellow, S. and M. Klivansky, Backup and Restore Practices for Enterprise, Prentice Hall, 2000. [8] Azagury, A., V. Dreizin, M. Factor, E. Henis, D. Naor, N. Rinetzky, O. Rodeh, J. Satran, A. Tavory, and L. Yerushalmi, ``Towards an Object Store,'' 20th IEEE Symposium on Mass Storage Systems (MSST), 2003. [9] https://www.trolltech.com/products/qt/. |
|
This paper was originally published in the
Proceedings of the 18th Large Installation System Administration Conference,
November 14–19, 2004 Atlanta, GA Last changed: 7 Sept. 2004 aw |
|