
A Case Study of the Rustock Rootkit and Spam Bot
Abstract:
In this paper we present a case study of the steps leading up to the extraction of the spam bot payload found within a backdoor rootkit known as Backdoor.Rustock.B or Spam-Mailbot.c. Following the extraction of the spam module we focus our analysis on the steps necessary to decrypt the communications between the command and control server and infected hosts. Part of the discussion involves a method to extract the encryption key from within the malware binary and use that to decrypt the communications. The result is a better understanding of an advanced botnet communications scheme.
The threat produced by botnets has escalated in recent years. Not only has the number of infected machines grown to catastrophic levels, but the sophistication level of the tools used to infect and control vulnerable systems has also increased. Traditionally, botnets have used the Internet Relay Chat (IRC) protocol for command and control [1,2,3]. This method is losing popularity among bot creators and herders since it is generally easy to detect, monitor, and block IRC traffic. New methods for hiding the command and control communications include HTTP based communications, encryption, and peer-to-peer network models [3,4,5,6].
In this analysis we examine a backdoor rootkit known as Backdoor.Rustock.B [7] or Spam-Mailbot.c [8] but hereafter referred to simply as rustock. While work has been done to deobfuscate the malware and study the rootkit [7,9], little information is available about the functionality of the spam bot that is contained within rustock. We are particularly interested in the communications between the command and control (C&C) server and infected hosts since they provide a glimpse into an advanced botnet communications scheme. The remainder of this paper presents a case study of the steps necessary to extract and reverse engineer the spam bot component.
First, we provide some information gleaned from observing the network traffic produced by the bot. Then, we walk through the three phases of deobfuscation leading to the extraction of the spam bot component. Next, we describe the reverse engineering of the spam bot leading up to the extraction of the session encryption key from memory that makes it possible to decrypt the C&C communications between client and server. Finally we summarize a sample decrypted C&C communication session between client and server.
Before we begin the static analysis of the rustock malware we are able to learn a lot about the functionality of the spam bot through direct observation of the network traffic between the client and server. By looking through a network traffic dump we determine that all C&C communications are encrypted. The communications can be divided into two phases: key exchange and instructions. Both phases are initiated by the client in the form of HTTP POSTs. Figure 1![[*]](crossref.png) gives a general overview of the encrypted communications.
gives a general overview of the encrypted communications.
Figure 1:
Spam bot command and control
 |
The key exchange phase is similar in all C&C sessions we observed. The HTTP POST from the client contains a 96-byte encrypted payload and is sent to the login.php page on the server. This is followed by a response from the server containing a 16-byte payload.
The instruction phase of the C&C communications consists of a variable number of HTTP POSTs from the client and corresponding responses from the server. The size of the payloads contained within these packets is also variable and therefore assumed to be dependent upon the variable nature of the underlying C&C instructions.
In addition to the information we gained through observation of the network traffic the people at Symantec helped us recognize that the encryption algorithm used to encrypt the data was RC4.
By combining the information we gather from static and dynamic analyses, we are able to ultimately decipher the communications between the client and server. This section describes the static analysis portion of the investigation into rustock. We perform the static analysis on this malware by studying the obfuscated disassembly code of the binary file lzx32.sys. The MD5 sum of this particular variant is: FDAFB3A14338B2B612C4E5C4F94B3677.
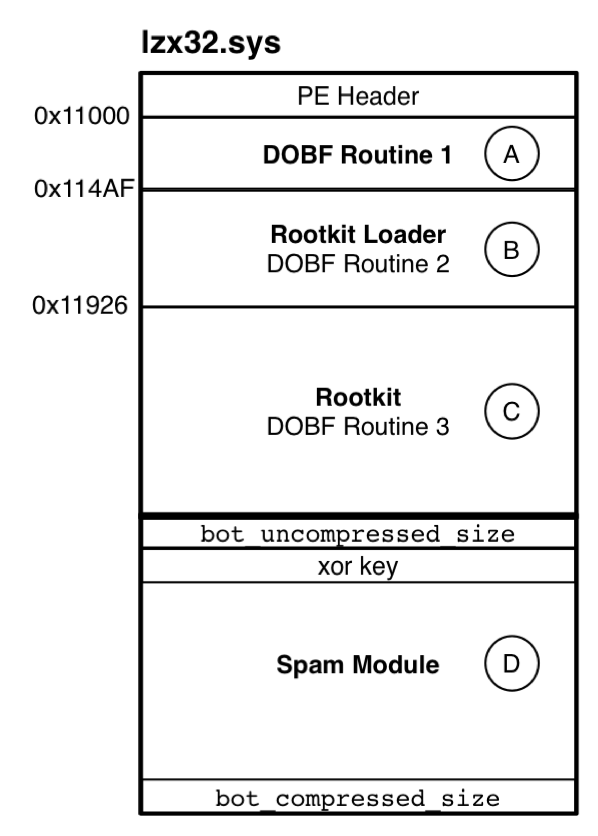
As shown in Figure 2, the malware contains four main components: the initial deobfuscation routine, the rootkit loader, the rootkit, and the spam module.
Figure 2:
Overview of the lzx32.sys malware. In our analysis we break it down into four parts: A. The first deobfuscation routine, B. The rootkit loader which contains the second deobfuscation routine, C. The rootkit containing the third deobfuscation routine, and D. The spam module.
 |
IDA Pro 5.0 Standard Edition [10], an interactive disassembly tool is used to study the code. A useful plug-in to the disassembly tool called idax86emu [11] is also employed to deobfuscate the malware. The plug-in tool emulates the x86 CPU instruction set and can modify the disassembly as it walks through the obfuscated code.
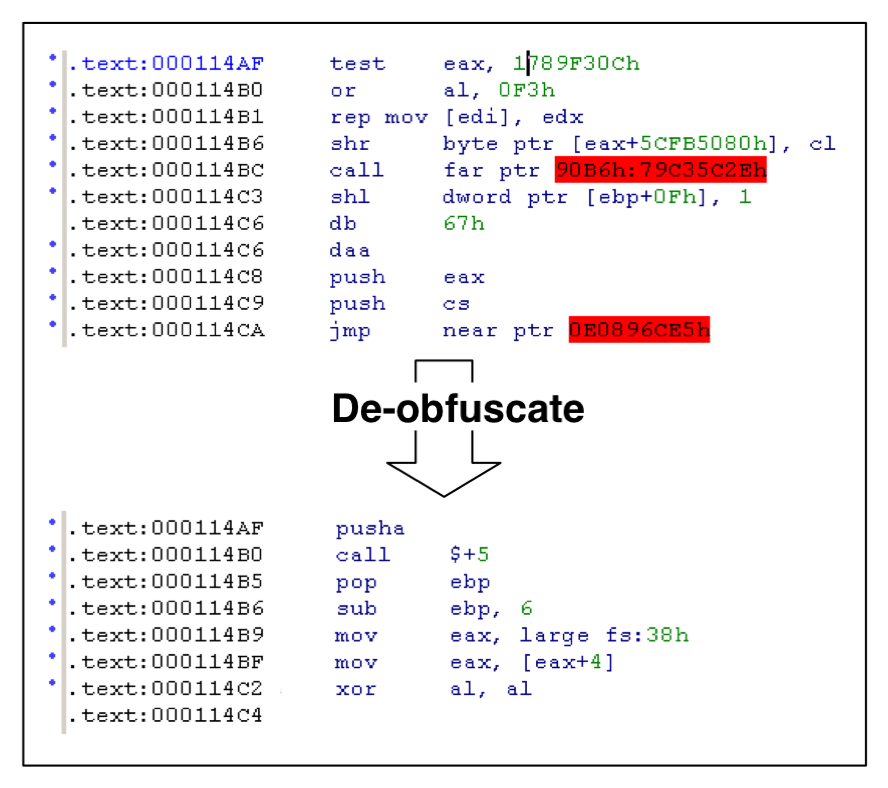
The Portable Executable (PE) header found within the lzx32.sys executable points to an entry point located at address 0x00011000. This is the starting point of the first deobfuscation routine. The code at the entry point consists of a series of nested loops that contain instructions to self-modify the code starting at 0x000114AF (note: this address and all future references to addresses in this section are virtual addresses as seen by the disassembler and may be different with other versions of the malware).
Using the emulator, we follow the deobfuscation routine to address 0x000114AF. At this address, the deobfuscated code looks different and makes more sense than the code prior to running through deobfuscation, see Figure 3. This is the beginning of the rootkit loader.
Figure 3:
View of the disassembled code at the rootkit loader's entrypoint before and after deobfuscation.
 |
After a careful study of the code contained within the rootkit loader, we learn it takes the following steps:
- Searches for the ntoskernl.exe image in memory and imports the functions: ExAllocatePool, ZwQuerySystemInformation, ExFreePool, and stricmp.
- Using these imported functions, the malware allocates a chunk of memory of about 34k (0x8800 bytes) and deobfuscates the memory chunk starting at address 0x00011926 into the allocated memory. The deobfuscation routine used at this stage (DOBF Routine 2 in Figure 2) can be recognized by the parameters passed to the function; they are the address of the encrypted 0x8800 bytes embedded in the binary and the address of the 0x8800 bytes of newly allocated memory. The deobfuscation routine is called at 0x00011593. The deobfuscated memory turns out to be another PE executable, which is then mapped back to location 0x00011926. This executable is the embedded rootkit component that we will discuss in section .
- Using the PE header of the embedded rootkit component starting at 0x00011926, the rootkit loader sets up the import tables by using the strings table located within the deobfuscated rootkit component. Some example function names are ZwEnumerateKey, ZwCreateKey, and ZwQueryKey. These functions will be used by the rootkit component later to hide itself. The rootkit loader then does any necessary relocation using the relocation section of the embedded binary.
- Since the rookit component is now decoded and mapped into the malware, its PE header is no longer needed. Therefore, in an attempt to defeat RAM forensics, the rootkit loader deletes the MZ and PE signatures bytes from the decoded rootkit executable from memory before passing control to the embedded rootkit binary.
- The rootkit loader now jumps to 0x00011D92, the entry point of the rootkit component, which will be discussed next.
The Rootkit Component
The rootkit component's primary purpose is to hide traces of itself from the user. For example, in our dynamic test environment, the registry key HKLM\system\CurrentControlSet\services\pe386 used to start the malware disappears from the registry as soon as the malware is loaded. A detailed discussion of the rootkit's functionality is outside of the scope of this paper, however, a general discussion of the steps it takes that lead up to the extraction and execution of the spam component is discussed here.
The rootkit component entry function at 0x00011D92 takes two arguments:
- A pointer to an object representing the original malware driver file, i.e. lzx32.sys. It appears that this object is created by the Windows operating system when driver files are loaded into memory as a service.
- The registry path pointing to the registry key that loaded the malware driver file into the operating system. This path is Unicode encoded.
Knowing that the first argument is a pointer to the file object representing the original malware driver file is key in understanding how a modular component can be loaded and executed by the rootkit component.
After storing the two arguments in global variables, a system thread is created. This thread has the following functionality:
- Creates a handle to the rootkit kernel driver named: \BaseNamedObjects\{DC5E72A0-6D41-47E4-C56D-024587F4523B} (Since this handle name is hard-coded into the binary, it may serve as a way to detect the presence of the rootkit module).
- Checks whether the loaded malware driver file is stored in an Alternate Data Stream (ADS).
- Deletes all sub-keys in the hive: HKLM\system\CurrentControlSet\Enum\Root\Legacy_lzx32.sys
- Replaces the registry functions to hide the registry key created to load the malware at boot.
- Creates a notify routine using PsSetCreateProcessNotifyRoutine which gets called for all process activity. This notify routine creates at most two threads to inject the spam component into the services.exe process. By doing this, the malware ensures its survivability.
- The rootkit then replaces the ZwQuerySystemInformation, and ZwTerminateProcess functions.
- The same routine that injects the spam component discussed in step 5 is called at this point to start the spam component. This routine will be discussed in detail next.
The spam component is encrypted and appended to the original driver file lzx32.sys. The rootkit uses the first argument to extract this encrypted executable. One way to detect the presence of the appended component is to parse the PE header of the original malware driver file. By so doing, one will notice that there is additional data past the end of the PE executable. To extract and decrypt the appended data, the rootkit takes the following steps:
- Reads the last four bytes of the original file, this is the size of the encrypted and compressed executable, we will call it bot_compressed_size.
- Moves the file pointer back by bot_compressed_size + 4, and reads in four bytes that represent the xor key.
- Reads in the next four bytes after the xor key, this is the uncompressed size of the appended file, we will call it bot_uncompressed_size.
- The xor key is then used to xor-decrypt the data four bytes at a time, starting from the byte after bot_uncompressed_size.
- Allocates and uses a memory chunk of size bot_uncompressed_size, the xor-decrypted data is then deobfuscated using deobfuscation routine 3 (DOBF Routine 3 is the same as DOBF Routine 2).
The resulting file is another PE executable that is the modular spam bot component. To properly extract this module, it is important to use the size variables detailed above. Using the wrong sizes results in an incomplete spam module.
It was previously mentioned that the spam module is injected into the services.exe process, this is another step taken by the malware to thwart detection. The rootkit component follows these steps to inject the module into the services.exe process:
- Finds the process ID of services.exe by using the ZwQuerySystemInformation API function to return all system thread and process information and searching the returned results. Once found the process ID is stored in a global variable.
- Creates another copy of the services.exe process.
- Sets up networking capabilities by hooking the tcpip.sys, wanarp.sys, and ndis.sys driver functions.
- Extracts, decrypts, and deobfuscates the spam module as described above.
- Maps the spam module into non-paged allocated memory.
- Calls KeAttachProcess to switch the memory context to the services.exe process.
- The rootkit then sets up an asynchronous procedural call that provides a method to run the spam module code.
Now that we have extracted and decrypted the spam module, we use our observations of the network traffic generated by the bot and our dynamic analysis to determine where to focus our static analysis. We target the function calls that post to the login.php and data.php server files. By analyzing these functions with the knowledge that the symmetric encryption algorithm is RC4, we are able to locate the code that randomly generates the session key and a location where the prepared form of the RC4 session key is stored in memory.
The RC4 encryption algorithm consists of two main parts, the key-scheduling algorithm, and the pseudo-random generation algorithm [12]. To generate the keystream the two algorithms make use of an internal state consisting of two parts, a permutation of all 256 possible bytes, and two 8-bit index pointers.
By comparing the two functions found within the assembly code with a C code implementation of RC4 [13], we are able to determine that the assembly functions are direct implementations of the two algorithms that make up RC4. Additionally, the struct stored in global memory is the secret internal state consisting of a 256 byte char array and two index pointers into the array. The function containing the key-scheduling algorithm is called once during login.php. This function initializes the internal state variable and stores it in the global struct. The session key itself is not stored in global memory and is therefore difficult to extract. Fortunately, having the internal state variables is as good as having the original key generated by the infected host.
The code snippet in Figure 4 is from the IDA pro disassembly and shows the instructions leading up to the storage of the global struct containing the state variables. We have named the global struct g_prepped_session_key.
Figure 4:
Disassbled code for the routine that stores the prepared session key in a global struct. The hex equivalent of the first 4-bytes of the highlighted code is used to generate a signature that will be used later to extract the prepared key.
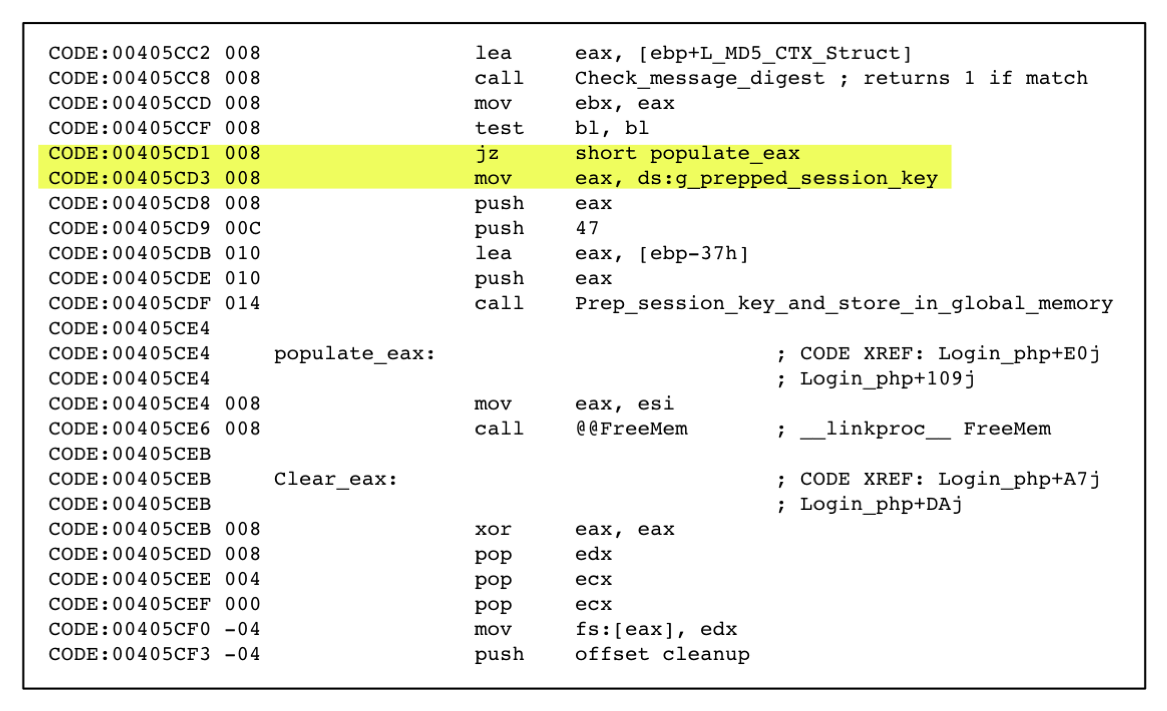 |
The instruction jz short loc_405CE4 is the instruction that precedes the code that prepares the session key and stores it in global memory. Converting this instruction and subsequent instructions to hexadecimal results in a unique signature 0x74 0x11 0xA1 0x64 that we will use later to search and extract from memory the internal state variables used to decrypt the encrypted network communications.
Now that we know what we are looking for we need to search through memory to find the RC4 internal state variable. Based on information gathered through the analysis of the rustock rootkit we know that the spam module is injected into the services.exe process. A thorough overview of live memory forensics is beyond the scope of this paper but we will discuss one method we used to extract the RC4 state variable from the memory of a running machine infected with the spam bot.
We used Microsoft's User Mode Process Dumper [14] to dump the memory space of the services.exe process to a file. Timing of the memory dump is critical since it must occur after the key exchange and instruction phases of the C&C session but before the next key exchange. Because the client typically initiates another C&C session with the server every few minutes it is important to keep track of the various sessions and the corresponding memory dumps. In order to prevent the possibility of the state variable being overwritten one could use a remote kernel debugger to break execution after the C&C session has completed rather than dumping the memory. The disadvantage of this method is that it affects the timing of subsequent C&C sessions and could be noticed by the server.
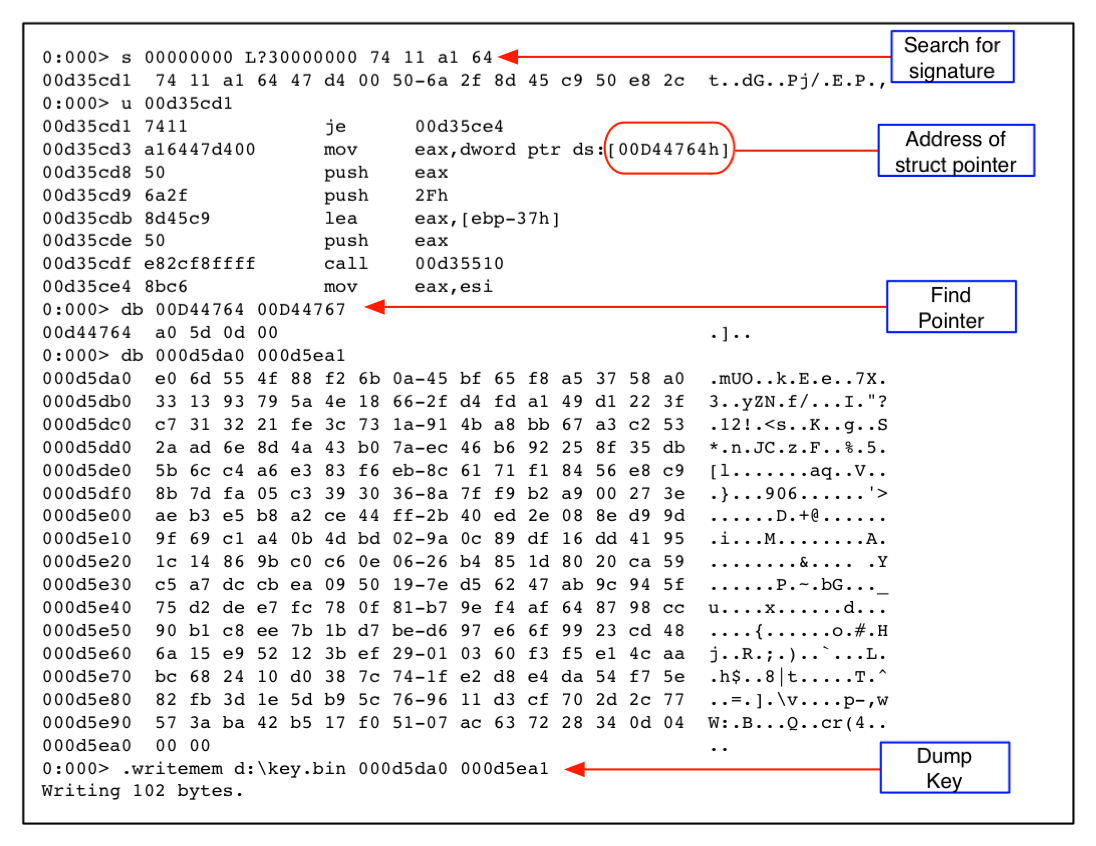
Once we have a memory dump and a corresponding network capture of the C&C session, we load the memory dump into Microsoft's windbg [15]. The log file shown in Figure 5 enumerates the steps we took to extract the key. First, we locate the signature isolated in the previous section (0x74 0x11 0xA1 0x64). Next, we disassemble several instructions starting at the memory address we just found. The mov instruction at address 0x00d35cd3 loads a pointer to the struct containing the RC4 state variables, so to find the key we simply dereference the pointer. Finally we dump the state variables to a file.
Figure 5:
windbg log file with comments. This shows how to extract the RC4 state variables from memory.
 |
Now that we have the RC4 state variables we decrypt the C&C communications. For each call to the data.php routine, there are two parts. First, the client copies the global struct containing the RC4 state variables to a local instance located on the stack and calls the RC4 encryption/decryption function on the string it wishes to encrypt. The C&C server receives the encrypted payload and decrypts it. Both the encryption on the client end and the decryption on the server end modify the state variables in precisely the same fashion, so the state is synchronized on both ends before and after encryption/decryption. From this point the server encrypts the response using the modified state variables and sends it to the client where it is decrypted. Again, the state variables are modified in the same way on both the server and client ends. Each call to the data.php function starts with a fresh copy of the global state variable struct.
To decrypt the captured C&C session we use the global struct we have extracted from the memory dump containing the state variables. We modify the C code implementation of RC4 [13] to read the key-scheduling state variables from disk rather then generating a new instance. For us to decrypt the communication we need to apply the RC4 encryption/decryption function (pseudo random generation algorithm) to the POST message from the client followed by the response from the server. This keeps the state variables synchronized and allows us to decrypt both sides of the communication. Each exchange consisting of a POST to data.php and reply from the server can be decrypted separately since the state variable is copied from the global struct to the stack each time.
One thing to note is that the first fourteen bytes of the client message are ignored when encrypting the message. This was noticed during the static analysis of the spam module. In order to keep the state variables synchronized, we also must ignore the first fourteen bytes of the message.
Table 1 is a summary of a sample C&C session we decrypted and consists of seven data exchanges. The client initiates the conversation by sending the "kill.txt" string for which the server responds with a list of processes to terminate and files to delete from the client. Some examples of processes are CAPP.exe, syswire.exe, Ravmond.exe. Some examples of files are m_hook.sys, comdlj32.dll, and secure32.html. Web searches for the processes and file names indicate that these are other malicious programs that the client may be infected with. This provides a way to eliminate other infections that may conflict with this bot.
| Message |
Message Contents or Summary |
|---|
| Client 1 |
"kill.txt" |
| Server 1 |
Server response specifies processes to terminate and files to delete from the client |
| Client 2 |
Information about the client |
| Server 2 |
Information for the client about the client and file names to create or request for subsequent communications with the server |
| Client 3 |
"neutral.txt" |
| Server 3 |
List of domain names to query for mail servers to use |
| Client 4 |
"unlucky.txt" |
| Server 4 |
List of SMTP server responses that indicate failure |
| Client 5 |
"tmpcode.bin" |
| Server 5 |
Binary data that specifies the formatting of spam message to be sent by the client |
| Client 6 |
"tmpcode.bin" |
| Server 6 |
Binary data including spam content |
| Client 7 |
"-" |
| Server 7 |
List of target email addresses |
|
Table 1:
Summary of decrypted C&C communications between the infected client and the server.
Next, the client sends information about itself to the server including bandwidth, OS version, SMTP availability (if outbound TCP/25 is allowed), if it is a virtual machine, and if it is blacklisted on a DNS blacklist. The server responds with additional information including the client's external IP address, machine name, task id that the server assigns to the client for a given spamming job, whether an update of the client is available, and names of additional command strings that the client can use for subsequent communications. An example of the command strings are "filesnames=neutral.txt" and "unluckystrings=unlucky.txt".
The next packet sent by the client is "neutral.txt", this request results in a list of domain names from the server. The client puts these domain names in a double-linked list and queries them for the presence of mail servers.
The fourth client request in this session is "unlucky.txt". This request results in a list of error messages that an SMTP server could return. Some examples are "Please use your provider SMTP" and "your mail rejected"
In the fifth and sixth exchange, the client sends the request string "tmpcode.bin" and the server responds with binary code and spam content that is used by the client to generate spam messages that are dynamic in nature to bypass spam filters.
Finally, in the last session, the client send a single dash ("-") to which the server responds with a list of email addresses where spam messages will be sent.
Rustock is an advanced piece of malware used to effectively hide criminal activity. The rootkit technology employed makes it difficult to detect the infection at the host level. The use of encrypted HTTP for C&C makes it difficult to detect at the network level. Even after detection of the malware, the multiple levels of obfuscation makes it difficult for analysts to find information about the C&C servers to generate signatures.
Based on our observation that the starting address of the deobfuscated code changed between versions of lzx32.sys as well as different obfuscation techniques we conclude that the outer most binary packer/obfuscator was changed. It is likely that the reason for this is that the authors of the code were attempting to avoid antivirus detection as well as to increase the amount of time that it takes to deobfuscate the code. Our technique for deobfuscation was not affected much by the different techniques since we step through the code using an emulator.
Our analysis of the C&C communications indicates ordinary spam bot functionality. Aside from this functionality the spam module also has the ability to download and execute arbitrary code. This could be used for other nefarious purposes. In addition, the modular design of the rootkit and embedded spam module makes it easy to update the spam module. During our experiments, we observed multiple updates to the spam module. These updates were confined to changes of C&C server domain names and search terms used to build the spam, but it indicates that it would be simple for those controlling the botnet to update the module with other features.
More work is needed to see if automated unpacking tools such as PolyUnpack [16] could be used to quickly deobfuscate the various binaries contained within lzx32.sys. This would greatly reduce the amount of time needed to analyze future versions of rustock.
Future work is also needed to better understand the details of the rustock rootkit. Since our focus was on getting to the spam module, we did not do a detailed analysis on the rootkit itself. Further details can be found in [9]. One element of the rootkit that needs more analysis is the alternative behavior exhibited when the malware driver detects that it is not stored in an ADS.
Additional work should be done to automate the key extraction and C&C decryption. One way to do this would be to continually monitor the network traffic from an infected client. Anytime a post to login.php is seen, a remote procedure call could be initiated to the infected host to dump the memory space of the services.exe process. Given the network captures and memory dumps it would be easy to write a script to extract the key from the dumps and decrypt the C&C communications in a way similar to our method.
We wish to express our appreciation to the people at Symantec who gave us several pointers about the deobfuscation of the rustock rootkit and helped us identify the encryption algorithm. We would also like to thank Chris Eagle from the Naval Postgraduate School for his tips on deobfuscation techniques and in using the idax86emu plugin for IDA Pro.
-
- 1
- Paul Bacher, Thorsten Holz, Markus Kotter, and Georg Wicherski, Know Your Enemy: Tracking Botnets,
https://www.honeynet.org/papers/bots/, (2005).
- 2
- Paul Barford and Vinod Yegneswaran, An Inside Look at Botnets,
https://www.cs.wisc.edu/~pb/botnets_final.pdf
- 3
- Nicholas Ianelli and Aaron Hackworth, Botnets as a Vehicle for Online Crime,
https://www.cert.org/archive/pdf/Botnets.pdf, (2005).
- 4
- Phatbot Trojan Analysis, LURHQ Threat Intelligence Group,
https://www.lurhq.com/phatbot.html, (2004).
- 5
- Sinit P2P Trojan Analysis, LURHQ Threat Intelligence Group,
https://www.lurhq.com/sinit.html, (2004).
- 6
- Robert Lemos, Bot software looks to
improve peerage, SecurityFocus,
https://www.securityfocus.com/news/11390, (2006).
- 7
- Backdoor.Rustock.B, Symantec,
https://www.sarc.com/avcenter/venc/data/backdoor.rustock.b.html, (2006).
- 8
- Spam-Mailbot.c, McAfee,
https://vil.nai.com/vil/content/v_140181.htm, (2006).
- 9
- Frank Boldewin, A Journey to the Center of the Rustock.B Rootkit,
https://www.reconstructer.org/papers/A%20Journey%20to%20the%20Center%20of%20the%20Rustock.B%20Rootkit.zip, (2007).
- 10
- IDA Pro,
https://www.datarescue.com/idabase
- 11
- The x86 Emulator plugin for IDAPro, Chris Eagle,
https://ida-x86emu.sourceforge.net
- 12
- Bruce Schneier, Applied Cryptography: Protocols, Algorithms, and Source Code in C, Second Edition, John Wiley and Sons, New York, NY, (1996).
- 13
- RC4 C source code,
https://www.cypherspace.org/adam/rsa/rc4.c
- 14
- Microsoft User Mode Process Dumper,
https://www.microsoft.com/downloads/details.aspx?FamilyID=E089CA41-6A87-40C8-BF69-28AC08570B7E&displaylang=en
- 15
- Microsoft windbg,
https://www.microsoft.com/whdc/devtools/debugging/default.mspx
- 16
- Paul Royal, Mitch Halpin, David Dagon, Robert Edmonds, and Wenke Lee, PolyUnpack: Automating the Hidden-Code Extraction of Unpack-Executing Malware. In Proceedings of the 22nd Annual Computer Security Applications Conference (ACSAC 2006) (December 2006).
- Sandia National Laboratories
![[*]](footnote.png)
- Sandia is a multiprogram laboratory operated by Sandia Corporation, a Lockheed Martin Company, for the United States Department of Energy's National Nuclear Security Administration under Contract DE-AC04-94AL85000.
Levi Lloyd
2007-04-03